Writing a Ghidra processor specification part 3
More on addressing modes
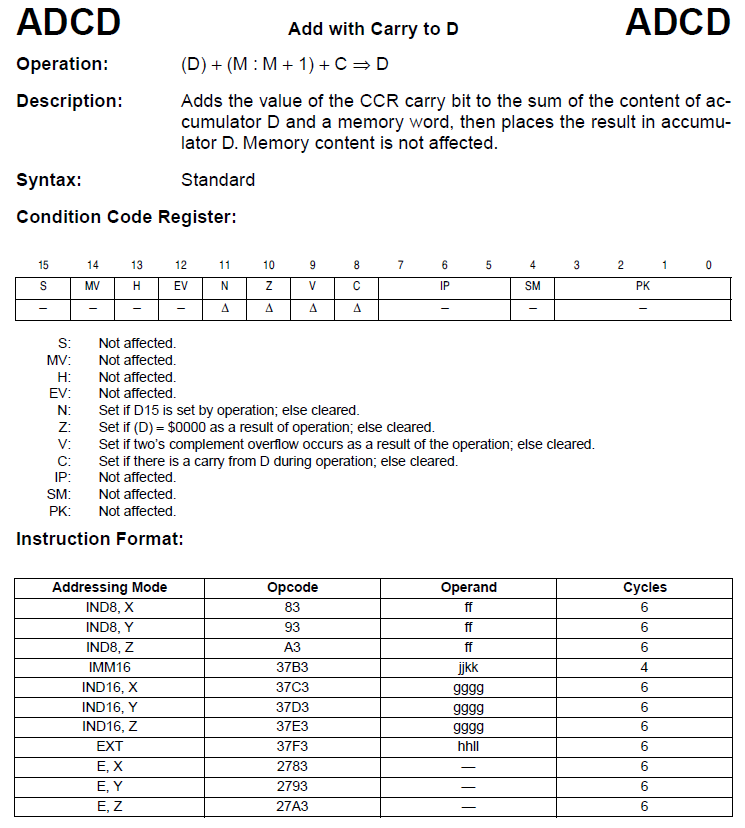
Following on from the previous post, another example of an addressing modes table is for a group of 10 HC16 instructions: ADCD, ANDD, CPD, EORD, LDD, ORD, SBCD, SUBD, STD, ADDD.
This requires support of another mode called accumulator offset, which computes a target address by adding together a value in register E, an index register, and an offset operand. As before, we can start by defining a single entry table called “accumulator E” to some of the work.
accumulator_E: "E",indexReg is prefix=2 & indexReg
{ local addr:4 = indexReg + sext(E); export addr;}

We can use this, together with previous tables from the last post, to build up a table called memWord5 to implement this group of instructions.
memWord5: offset_s16,indexReg is prefix=3 & op6_6=0b1 & indexReg ; offset_s16 { local addr:4 = indexReg + offset_s16; export *:2 addr; }
memWord5: extendedAddr is prefix=3 & op6_6=0b1 & op5_4=0b11 ; extendedAddr { local addr:4 = extendedAddr; export *:2 addr; }
memWord5: offset_u8,indexReg is prefix=0 & op6_6=0b0 & indexReg ; offset_u8 { local addr:4 = indexReg + offset_u8; export *:2 addr; }
memWord5: accumulator_E is op6_6=0b0 & accumulator_E { local addr:4 = accumulator_E; export *:2 addr; }
memWord5: "#"^imm16	is prefix=3 & op6_6=0b0 & op5_4=0b11; imm16 { export *[const]:2 imm16;}
memWord5: "#"^imm8 is prefix=0 & op8=0xFC; imm8 {local addr:2 = sext(imm8:1); export *[const]:2 addr;}

Note here that a memory word value, rather than a byte value, is returned using export *:2 addr, rather than export *:1 addr
Addressing mode immediate16 is also added, using the line memWord5: "#"^imm16 is prefix=3 & op6_6=0b0 & op5_4=0b11; imm16 { export *[const]:2 imm16;}
This uses the construct export *[const]:2 imm16;, as suggested here, which recommends “Exporting unique local variables should be avoided when possible in favor of a register, constant or memory address to aid markup and analysis. You can’t avoid in some cases (e.g., indirect addressing).”
There are some additional ‘quirks’ for this particular HC16 CPU, and these illustrate why the manual needs to be read carefully. For this group of 10 instructions, STD uniquely does not support immediate16 mode - it would decode but 0x37BA instruction does not exist. And on top of that, the ADDD instruction uniquely adds immediate 8 support, which we can then implement with a direct match to op8 pattern op8=0xFC. And the implementation of immediate8 for ADDD is not as for some other instructions in the HC16 set. “The AIS, AIX/Y/Z, ADDD and ADDE instructions decrease execution time by sign-extending the 8-bit immediate operand to 16 bits, then adding it to an appropriate register”. The final implementation of ADDD is then:
:ADDD memWord5	is ((op7_7=0b1 & op3_0=0b0001 & (prefix=0 | prefix=2 | prefix=3)) | (prefix=0 & op8=0xFC)) ... & memWord5
{
	local op1:2 = memWord5;

	local result:2 = D + op1;
	addition_flags16(D, op1, result);

	D = result;
}

Branches
Branches are well described in the SLEIGH guide. The HC16 processor has a pipe-lined architecture, so various adjustments need to be made to branching instructions. An offset (+6) needs to be added to relative branches. This can be implemented in tables created to calculate 8 bit and 16 bit relative branches, which we can call dest_rel8 and dest_rel16.
dest_rel8: reloc is	simm8	[reloc = inst_start + 6 + simm8;]
{
export *:1 reloc;
}

dest_rel16: reloc is	simm16	[reloc = inst_start + 6 + simm16;]
{
export *:1 reloc;
}
Implementation of the branch is then simple, as in the HC16 LBCS instruction (long branch on carry set) below.
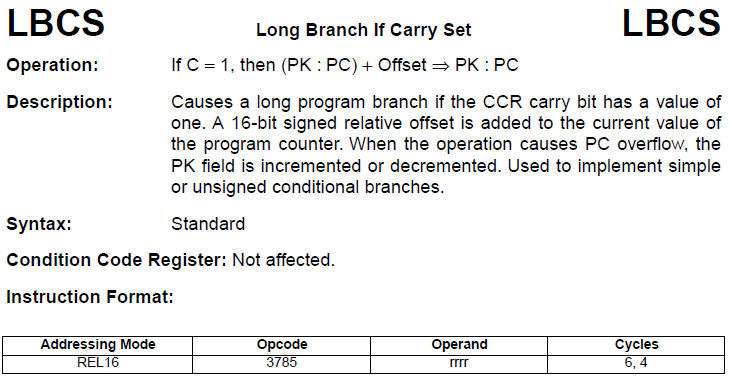
:LBCS dest_rel16 is prefix=3 & op8=0x85; dest_rel16
{
if (C == 1) goto dest_rel16;
}
The HC16 specifies that a subroutine call shall stack the value of program counter + 6. An HC16 branch to subroutine (BSR) instruction is 2 bytes length, so an adjustment +4 is added to the next instruction address pointer, before the address is stacked. This can be seen in the BSR instruction implemention.
:BSR dest_rel8 is prefix=0 & op8=0x36; dest_rel8
{
local tmp_PCfull:4 = inst_next+4;
local tmp_PC:2 = tmp_PCfull:2;
push2( tmp_PC );
syncCCRtoFlags();
local tmp = CCR_PK;
push2( tmp );

call dest_rel8;
}
Similar adjustments are required for other program change of flow instructions.
Other files required for a complete processor module
The .psepc file primarily identifies how Ghidra can identify the program counter register(s). For our HC16 example, we have also added some definitions for the reset vectors.
<?xml version="1.0" encoding="UTF-8"?>

<!-- See Relax specification: Ghidra/Framework/SoftwareModeling/data/languages/processor_spec.rxg -->

<processor_spec>
  <programcounter register="PCextended"/>

  <default_symbols>
    <symbol name="VECTOR_Reset_Initial_ZK_SK_PK" address="code:0000"/>
    <symbol name="VECTOR_Reset_Initial_PC" address="code:0002"/>
    <symbol name="VECTOR_Reset_Initial_SP" address="code:0004"/>
    <symbol name="VECTOR_Reset_Initial_IZ" address="code:0006"/>
   </default_symbols>
</processor_spec>
The .slaspec in the HC16 example just refers to the .sinc file, where the all the sleigh implementation code is stored.
@include "MC68HC16.sinc"
The compiler spec (.cspec) provides guidance on the compiler that was used to generate the target code (assuming that a compiler was used to create the target software being analyzed). If the code written in assembler, this is not really relevant, and a ‘dummy’ file can be created.
<?xml version="1.0" encoding="UTF-8"?>
<compiler_spec>
    <default_proto>
        <prototype name="default" extrapop="unknown" stackshift="0">
            <input></input>
            <output></output>
        </prototype>
    </default_proto>
</compiler_spec>
As an alternative, a basic set of definitions is shown below for the HC16 example.
<?xml version="1.0" encoding="UTF-8"?>

<!-- See Relax specification: Ghidra/Framework/SoftwareModeling/data/languages/compiler_spec.rxg -->

<compiler_spec>
  <global>
    <range space="code"/>
  </global>
  <stackpointer register="SPextended" space="code" growth="negative"/>

  <returnaddress>
    <varnode space="stack" offset="0" size="4"/>
  </returnaddress>

    <default_proto>
     <prototype name="__cdecl" extrapop="4" stackshift="4" strategy="register" >
      <input>
         <pentry minsize="1" maxsize="500" align="2">
    	   <addr offset="4" space="stack"/>
        </pentry>
      </input>
      <output>
        <pentry minsize="1" maxsize="2">
          <register name="D"/>
        </pentry>
      </output>
       <unaffected>
        <register name="SPextended"/>
        <register name="IZE"/>
      </unaffected>
    </prototype>
  </default_proto>
The Ghidra Book provides a good overview of the decompiler operation. More details on cspec can also be found in the Ghidra documentation (there is a cspec.xml file in the Ghidra respository, likely at Ghidra/Features/Decompiler/src/main/doc) (see also here
Adding a manual file
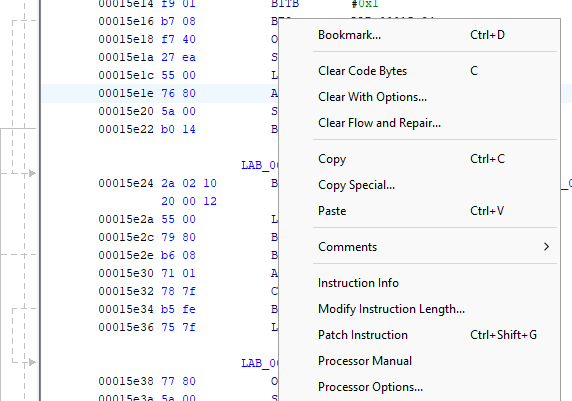
A processor manual index maps instruction mnemonics to pages in the pdf manual(s). Right clicking on an instruction in the Ghidra listing, and selecting “Processor Manual” will open a browser page displaying the instruction details (from a referenced pdf doc).
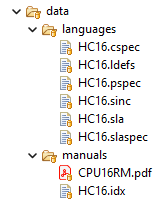
A file called an index file needs to be created, which has the same name as the processor module. It is placed, along with pdfs, in the ghidra processor module directory, in / data / manuals.
The first line defines pdf file to use for mnemonic entries. Subsequent lines reference the various instructions
- The format is: Mnemonic (in caps), page number
- < is used to import another index file
- # is used for comments
The first few lines for HC16 example are:
@CPU16RM.pdf
ABA, 71
ABX, 72
ABY, 73
ABZ, 74
ACE, 75
ACED, 76
ADCA, 77
ADCB, 78
Compiling and exporting
The SLEIGH description of the processor module can be compiled (which generates a .slaspec file), by right clicking on “buildLanguage.xml”, and selecting Run As > Ant Build
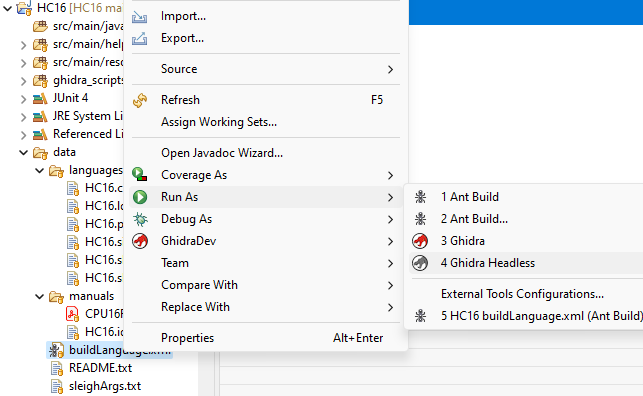
Testing can be done with a linked version of Ghidra by selecting Run As > Ghidra.
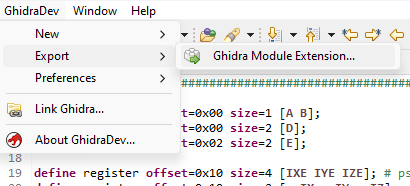
The processor module can be exported by selecting GhidraDev > Export > Ghida Module Extension, and clicking Finish. It will be stored in the “dist” folder of the project as a zip file with name something like “
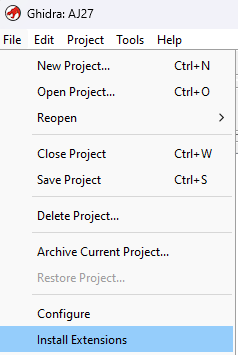
This module can be imported into a Ghidra installation by selecting File > Install Extensions, clicking the green “plus” symbol in the top right corner, selecting the file, and opening it. Ghidra then needs to be closed, and re-started

The example MC68HC16 processor module can be found on Github here